先日構築したOpenCTIに登録された indicatorにAPIからアクセスできるか確認してみました。
できれば指定した indicator をピンポイントで検索できればと思っていますが、その前に取り合えず、APIから登録した indicator をリストで表示させることができたので、ここに記録しておきます。
なお、APIの使い方については以下のサイトに記載されています。
https://github.com/OpenCTI-Platform/client-python/blob/master/docs/client_usage/getting_started.rst
1.pycti のインストール
もしOpenCTIの環境に pycti を入れていないようであれば、以下の要領でインストールしておきましょう。
sudo apt install python3-pip
pip3 install pycti
2.Indicatorの登録
冒頭で紹介したサイトにサンプルが掲載されていますので、それをすこしいじって OpenCTI に indicator を登録します。
おもに以下の太字の部分を環境に合わせて修正すれば大丈夫です。
from dateutil.parser import parse
from pycti import OpenCTIApiClient
from stix2 import TLP_GREEN

# OpenCTI API client initialization
opencti_api_client = OpenCTIApiClient("http://localhost:8080", "<ローカルに立てたOpenCTIのAPI Keyを設定>")

# Define an OpenCTI compatible date
date = parse("2023-07-16").strftime("%Y-%m-%dT%H:%M:%SZ")

# Get the OpenCTI marking for stix2 TLP_GREEN
TLP_GREEN_CTI = opencti_api_client.marking_definition.read(id=TLP_GREEN["id"])

# Use the client to create an indicator in OpenCTI
indicator = opencti_api_client.indicator.create(
    name="C2 server of the new campaign",
    description="This is the C2 server of the campaign",
    pattern_type="stix",
    pattern="[IPv4-Addr:value = '100.172.180.181']",
    x_opencti_main_observable_type="IPv4-Addr",
    valid_from=date,
    update=True,
    markingDefinitions=[TLP_GREEN_CTI["id"]],
)
上記プログラムを「create_indicator.py」という名前で保存して、以下の通り OpenCTIのサーバ上で実行します。
$ python3 create_indicator.py
INFO:pycti.entities:Listing Threat-Actors with filters null.
INFO:pycti.entities:Reading Marking-Definition {marking-definition--34098fce-860f-48ae-8e50-ebd3cc5e41da}.
INFO:pycti.entities:Creating Indicator {C2 server of the new campaign}.
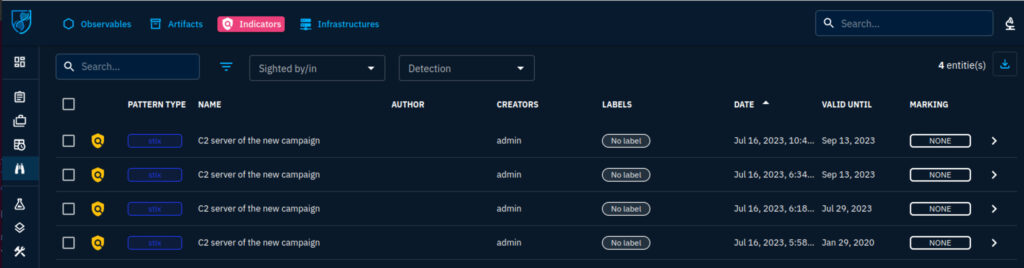
3.Indicatorのリスト表示
それでは次に、OpenCTI に登録した Indicator をリストで表示してみます。
プログラムについては以下のサイトのものを参考にカスタマイズしています。
https://github.com/OpenCTI-Platform/client-python/blob/master/examples/get_all_indicators_using_pagination.py
以下、カスタマイズ後のプログラムです。
実行時に「pattern」や「description」などを表示するようにしています。
from pycti import OpenCTIApiClient

# Variables
api_url = "http://localhost:8080"
api_token = "ローカルに立てたOpenCTIのAPI Keyを設定>"

# OpenCTI initialization
opencti_api_client = OpenCTIApiClient(api_url, api_token)

# Get all reports using the pagination
custom_attributes = """
    id
    pattern_type
    pattern
    created
    description
"""

final_indicators = []
data = {"pagination": {"hasNextPage": True, "endCursor": None}}
while data["pagination"]["hasNextPage"]:
    after = data["pagination"]["endCursor"]
    if after:
        print("Listing indicators after " + after)
    data = opencti_api_client.indicator.list(
        first=50,
        after=after,
        customAttributes=custom_attributes,
        withPagination=True,
        orderBy="created_at",
        orderMode="asc",
    )
    final_indicators += data["entities"]

for indicator in final_indicators:
    print("[" + indicator["created"] + "] " + indicator["pattern"] + ", " + indicator["description"])
そしてこれが実行結果です。
$ python3 get_all_indicators.py
INFO:pycti.entities:Listing Threat-Actors with filters null.
INFO:pycti.entities:Listing Indicators with filters null.
[2023-07-17T00:58:42.733Z] [domain-name:value = 'www.5z8.info'], This is the C2 server of the campaign
[2023-07-17T01:18:55.912Z] [IPv4-Addr:value = '100.172.180.180'], This is the C2 server of the campaign
[2023-07-17T01:34:48.208Z] [IPv4-Addr:value = '100.172.180.181'], This is the C2 server of the campaign
indicator やそのdescriptionがきちんと表示されています。


